

Overview
This article is for us. The non-developers, the non-tech folk, those of us who think of Lego when we hear the word “blockchain”.
In this article, we’ll run through the steps of setting up a Lighthouse client and accessing Ethereum 2.0, aka eth2. The road might feel a little bumpy at times, but buckle up, hang tight and we’ll be validating together in no time.
Buckle-up, let’s do this!
Now, above I said “in no time”. But to be honest, “no time” means around two hours. Don’t worry, it’s well worth it.
In the coming steps we’ll cover starting an Eth1 and Eth2 client, running a testnet, depositing gETH and becoming a testnet validator.
Yep, my brain just imploded a little as well. But we’ll make sense of this right…now!
Learning to speak nerd.
Okay, slight sidetrack here, but I threw some new concepts, words and seemingly random collections of letters at you just before. I’m sorry, but let me make up for it with a geek glossary.
Below are human-friendly definitions of some new words or phrases we’ll be using a lot in the coming steps. Learn them, love them, they will be your friends for the next two hours and beyond.
- Eth1 is simply the shortened form of the first generation (aka release) of Ethereum.
- Eth2 is simply the shortened form of the new generation of Ethereum (currently running in parallel) also known as Ethereum 2.0.
- Ethereum is designed to offer different clients, developed by different teams using different programming languages. These clients are software applications that run the Ethereum blockchain technical specifications (or rules). The idea behind having multiple clients is so that if one fails, say due to a bug, the entire network does not crumble. Commonly used Eth1 clients include Geth, Nethermind, Besu, OpenEthereum Commonly used Eth2 clients include Lighthouse, Prysm, Teku, Nimbus
- Nodes are hardware (aka computers) that are participating in the Ethereum network. Once we are done, the computer you are on will be a node on the Ethereum network.
- ETH is the inbuilt native cryptocurrency of Ethereum.
- Goerli ETH commonly tagged as GöETH or gETH is a test cryptocurrency on a test network called Goerli. It has no real value and simply facilitates experimentation without incurring real-world costs.
- Testnets are an exact simulation of the Ethereum blockchain network for the sole purpose of practising or experimenting without incurring real-world consequences.
- You can think of a validator as a voter for new blocks. The more votes a block gets, the more likely it is to be added to the blockchain. In exchange, honest validators receive financial rewards for helping to secure the blockchain network.
- The only way to become a validator is through staking. And staking is currently a one-way ETH transaction into the Ethereum 2.0 network as collateral - in other words, have some skin in the game. This encourages validators to act responsibly, or they’ll be financially penalised from their staking amount.
Let’s jump right in!
Open Terminal
You’ll need to use Terminal throughout this entire process. Terminal can be found in Finder > Applications > Utilities > Terminal.
This application provides text-based access to the operating system of your computer, from the terminal you have direct access to tweaking almost everything about your computer's software code. This will either have you feeling mad with power, or a little weezy (I was the latter surprise surprise 😅)
Tips & Tricks
- The text written in the terminal are called commands or command-lines.
- Commands are case sensitive.
- To execute a command, type what you need then press the return key on your keyboard. At that point, it will either return an error if you've typed something incorrectly, or the command will execute.
$will be used to signify the beginning of a command-line that you should copy-paste into the Terminal, but please DO NOT include the$symbol when pasting the command into the terminal.- If you run into any download issues or you can't open something we have downloaded, head over to
System Preferences > Security & Privacy > Generaland clickOpen Anyway. For more in depth information on this go here.
Install Homebrew
Homebrew is a package manager that makes it easy to install, update, configure, and uninstall applications on a Mac through the terminal.
For more in depth information on this go here.
- To install
Homebrewrun the following command in the terminal:$ /bin/bash -c "$(curl -fsSL https://raw.githubusercontent.com/Homebrew/install/HEAD/install.sh)" - This will prompt you to enter your computer password, then to press the return key.
- You’ll know it's finished once text stops automatically running. Then run this command to make sure it’s worked:
$ brew updateor$ brew help
Launchpad for Pyrmont Testnet
Launchpad is an eth2 onboarding platform created by the Ethereum Foundation, that walks you through the process of staking in Eth2. You are more than welcome to follow the Launchpad instructions directly, although I will offer some additional clarifications.
The Pyrmont Testnet is the last testnet before mainnet (the real deal). Fun fact, Pyrmont is where the Sigma Prime (Lighthouse founders and maintainers) office is located!
Click Get Started
You’ll be walked through an overview statement for each major step launchpad covers. Once you have read and understood, click accept and move on.
![]()
Things to remember as you move through these:
- Signing up Overview: Remember GöETH is a test cryptocurrency, and can be used without incurring any real-world costs. Getting GöETH is extremely simple, we’ll cover this shortly.
- Backup Mnemonic Overview: A Mnemonic or Seed is a secure password, a string of 24 words that is designed to be easy to write down and remember. This will be generated for you in steps to come.
- Signing Keys Overview: Each validator has two sets of keys: a signing key and a withdrawal key. These keys act as your digital signature or fingerprint on the system. A signing key is the key a validator needs in order to vote and propose new blocks. And a withdrawal key has the power to control a validator’s staking funds (transferring, and withdrawing ETH)
- Transfer Delay Overview: Remember at the moment we are only staking GöETH, a test cryptocurrency that holds no real value.
- Early Adopter Risks Overview: Remember slashing means to incur a large penalty.
- Confirmation Overview: Don’t let this one intimidate you, I’ll walk you through the “be technically capable of running commands in a terminal on a computer.” part.
Eth1 Client Selection
![]()
Steps to run Go-Ethereum (commonly known as Geth) are listed below, although you are welcome to select and run any client you like:
- Minimise the Launchpad window for now and reopen Terminal. Remember that handy little thing, Homebrew? Well now we get to see it in action.
- Run the following commands separately:
$ brew tap ethereum/ethereum$ brew install ethereum - Install the master branch using the --devel parameter
$ brew install ethereum --devel - Then to make sure it worked, you can simply run
$ geth --help - After ensuring the install worked, run the following command to create an account
$ geth account new - You will now be able to run Geth. Since we want to run it on a testnet we’ll need to add the --goerli flag - Görli is a permanent Eth1 Testnet that runs in parallel to the Pyrmont Eth2 Testnet
$ geth --goerli --http - Now just let it run until you see
$ Imported new chain segmentwhich signifies it has successfully synced
- Leave Geth syncing in the background and reopen Launchpad.
- On Launchpad select the Geth tile, scroll down and click continue.
Eth2 Client Selection
![]()
Steps to run Lighthouse are listed below, although you are welcome to select and run any client you like.
The steps below show you how to build Lighthouse from source, and are pulled from the Lighthouse Book. Building from source allows for the absolute best performance, and is a great way to get more familiar with code.
- Minimise Launchpad again, and open a new Terminal window.
- Download a building tool called
cmake.$ brew install cmake - Install the programming language Rust via
rustup. Rust is the programming language that Lighthouse is written in, therefore in order to build the Lighthouse client from source you need to have Rust installed.$ curl --proto '=https' --tlsv1.2 -sSf https://sh.rustup.rs | sh - Once prompted select
Option 1to proceed with installation (default) Let it run until you see “Rust is installed now” which signifies it has been successfully installed. - Update the search path in terminal
$ source $HOME/.cargo/env - Then to make sure it worked, you can simply run
$ rustup update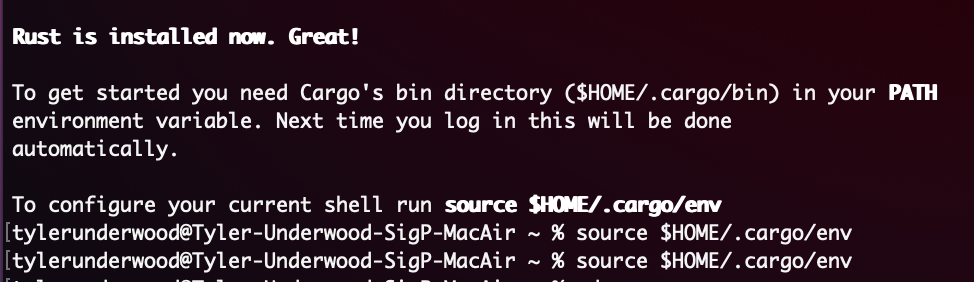
- Clone the Lighthouse repository
$ git clone https://github.com/sigp/lighthouse.git - Change into the newly created directory
$ cd lighthouse - Build Lighthouse
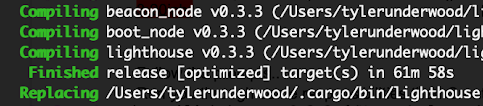
$ make - This will prompt a lot of command-lines to run automatically. This process will take several minutes.
Let it run until you see
$ Finished. - To ensure it worked, run the following which should display the command-line documentation.
$ lighthouse --helpOr run the following to check the version of Lighthouse.$ lighthouse --version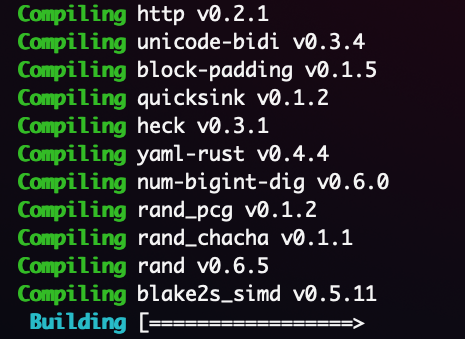
- Now that Lighthouse is installed, reopen Launchpad.
- On Launchpad select the Lighthouse tile, scroll down and click continue.
Generate Key Pairs
- On the next page of Launchpad, where it asks how many validators would you like to run, I recommend simply starting with 1.
- Select Mac as your operating system.
- Select to download the CLI app.
- Open GitHub, scroll down and click the asset titled
eth2deposit-cli-ed5a6d3-darwin-amd64.tar.gz - This should trigger an automatic download of the CLI app for your operating system.
- Decompress the file you just downloaded.
- Open a fresh Terminal window, and run the following commands individually to launch the app
$ cd downloads$ cd eth2deposit-cli-ed5a6d3-darwin-amd64$ ./deposit new-mnemonic --num_validators 1 --chain pyrmont - In the terminal window you’ll be prompted to choose your preferred language
- Then to type a password. There won’t be any appearance of you typing the password so type consciously!
- Correctly confirming the password, generates your mnemonic. Write your mnemonic down and store it safely, preferably offline. Oldschool, right?
- Once you’ve proven that you have written down your mnemonic, you’ll get your keys, a cute code rhino and the location of where your keys can be found.
- Return to Launchpad, and click continue at the bottom of the page.
Upload Deposit File
- Open finder and follow the path generated in terminal of the location of where your keys can be found
Example
/Users/fullname/Downloads/eth2deposit-cli-ed5a6d3-darwin-amd64/validator_keys - Drag the
deposit-data-[timestamp].jsonfile onto Launchpad - Click continue
Connect Wallet
By far, the easiest way to handle your cryptocurrency is with MetaMask. It's a browser extension that acts as a bank account, allowing transitions and to send or receive funds.
Steps to run MetaMask are written below, although you are welcome to select and run any wallet you like.
To connect a wallet you first must have an account. Head to MetaMask and follow the prompts to install MetaMask as a Chrome extension. You’ll then be prompted to get started, and create a wallet.
After following these prompts, you reach the homepage. Click the dropdown in the top right hand corner and switch to the Goerli Test Network.
![]()
Then hover your cursor over Account 1 and copy the key to clipboard.
Once you've copied this, open Discord which is a major instant messaging platform in this community. Click here to join the Ethstaker Discord server. Post the key you’ve copied to your clipboard to one of their channels and request GöETH. Ethstaker has set up an automation that will directly deposit GöETH into your account upon request.
![]()
Beacon Node
At this point you should have two terminal windows open. One running the Goerli testnet and the other where we downloaded the CLI.
Open a third fresh window, and start the beacon node by pasting.
$ lighthouse bn --network pyrmont --http
More information on the beacon node here.
Import Keys
- Using the terminal where we downloaded the CLI, paste the following.
$ lighthouse account validator import --directory eth2.0-deposit-cli/validator_keys - Enter your password when prompted, the one you created not the mnemonic one.
- Command lines started automatically running. Once the process is complete, you should see the following:
$ Successfully moved keystore.$ Successfully updated validator_definitions.yml.$ Successfully imported 1 validators.
Run Lighthouse Validator Client
Now for the last step, running the Lighthouse Validator.
On the same terminal, paste the following.
$ lighthouse vc --network pyrmont --http
And that’s it! You should now have Lighthouse up and running on the Pyrmont Testnet. Nice work!
If you have any questions, comments or would like more information head over to the Lighthouse Book or reach out on our Discord.